

Aaaaages ago I made some owls with pockets. I thought I'd make another one and then remembered that a couple of peeps had asked me for a tutorial, so I fired up Nan's old sewing machine...
First, cut yourself an owl shape from cardboard (old beer carton does the job for me) and cut yourself two pieces of fabric slightly larger than the owl. (blurred photo, sorry)

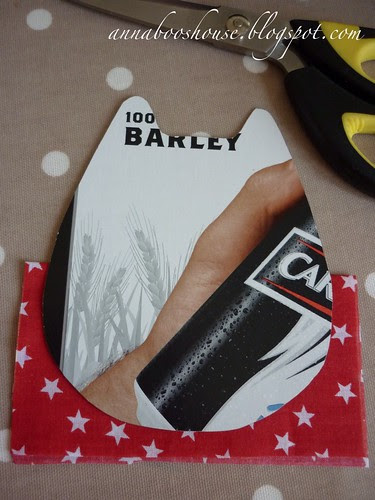
You'll also need a pocket. Cut a folded rectangle which fits across your owl's tummy and slightly wider and longer is what you should aim for. Iron this so the right sides are outside.
Next, cut yourself some eyes and a beak out of felt (or you could use buttons) and sew (by hand or machine) onto your owl. You could draw a faint chalk-line around your owl-y template so you can see roughly where your adornments should go, or if you're like me, you could just guess.

Next you should pin your owl's pocket into the right position. Make sure it sits below the owl's beak and is straight (ish).

Now turn your fabric over- you can see where your stitch marks are - and draw around the owl template with chalk again.
Not right? Just rub off the chalk and re-position until you're happy.
Pin the owl fabric (with pocket pinned inside) right sides together.

Now sew!
(By hand or machine)
Make sure you leave a gap of a few cms along the side of the owl, above the pocket, to turn it out.

Cut away the excess material and snip cuts along the outside curved edges/ and cut out notches along the inside curved edges.

Turn out. Use a knitting needle or chopsticks to poke out the ears.
Iron it flat.

Now stuff.
Keep stuffing.
It needs a lot of stuffing.

Now sew closed. I use a ladder stitch (check out this turorial) but you could use a bright coloured embroidery floss and sew a blanket stitch to make it stand out.
Admire.
In need of an owl with a pocket?
Well now you can have one.
Have a good week, all.
Xx
P.S. I love reading your comments. Seriously. Thank you.
P.P.S I am a very nice, helpful person. If you have any questions or queries about my tutorials or posts, then do ask me- I'm more than happy to give advice, or point you in the right direction.
P.P.P.S. Trolls are not welcome.
Ooooh Sarah you clever wotsit! Loves it I do :D He's fabbo!
ReplyDeleteJo x x
Your pocket owl is just the cutest. Thanks for sharing. :)
ReplyDeleteAnne xx
This is fab Sarah,my daughters would love one of these,thank you sooo much for your lovely email,I looked the crochet book up think im gunner have a go,sorry I didn't get back sooner but lots of poorly kids at the mo
ReplyDeleteBye for the now
XX Manda XX
So cute and so easy to do! Thanks for the tutorial, will have to give it a go with my 7 year old.
ReplyDeleteHave a gorgeous weekend,
Sandra x
Talk about gorgeous!! Every time I visit you I see something else I want to add to my list of things to make! Thank you for your constant inspiration hon. Also I have to say, how cute is your sewing basket?? I love it. Have a fab weekend.
ReplyDeleteLeah
xx
What a brilliant idea, Sarah! Thanks for sharing! Soooo many things now on my 'must try one day' list....
ReplyDeleteCarly
x
This comment has been removed by the author.
ReplyDeleteYou make I laugh. Trolls not allowed..........how dare you shun me in this way! Ha!!!!
ReplyDeleteDebs and I just texted each other, girls both got into the desired school for Sept so are well chuffed.
Hope you had good weekend, Brighton and BBQ.....sounded lush.
When I saw you last week I had mega sore throat coming, can you believe it's STILL there....grrrrr.
Lovely owl. Owl have to make one of those.....oh soz.......
xxx
He's just fab. Great tutorial - I think even I might be able to cope with making one!
ReplyDeleteLove too your hooky lampshade - inspired!!
Have a super duper weekend.
Hx
You are one clever lady.... I love this and will make them for Christmas gifts..... (It is my goal to have Christmas done by Thanksgiving..... okay maybe it is more a fleeting dream ;) but I am going to try)
ReplyDeleteThanks for sharing your brilliance with the rest of us!
Stacey
Sweeeeeeeeeet!!! Loving the eyes, what a fabulous owl, who knew we needed owls with pockets but we really do :-)
ReplyDeleteHave a great weekend,
love Lori xxx
I Sarah,
ReplyDeleteI'm a new follower: I like very much your blog and your beautiful creations!
Kisses from Verona.
Monica
Thanks for sharing the tutorial - I love it.
ReplyDeleteI've had a go at making a version today. Take a look: http://jumbleberries.blogspot.co.uk/
I'd love to know what you think.
Have fun.
Jumbleberries xx
I love your owl, so cute. I think I will make one for my nephew. It will make a great tooth fairy pillow!
ReplyDeleteCuteness overload!! This is adorable, and what a fantastic tutorial!! Super cute!!
ReplyDeleteeeeeep- I love this tutorial, and what a great way to use an old a pair of jeans. Its Sunday, so I may just have to make a couple of these for my girls- Thank you xxx
ReplyDeleteMy mom loves anything 'owl' and as she has a birthday coming up - thanks Sarah - think she just might be finding one of these as a gift!
ReplyDeleteGorgeous owl, great tutorial ... if only my sewing machine hadn't just died!
ReplyDeleteHe is adorable Annaboo. Well done. Great tutorial. What have you got against trolls?
ReplyDeletethis is super adorable!! Thanks for sharing! :D
ReplyDeletei love the pocket old so cute
ReplyDeleteElla xxx
PS: please comment on my new post
Great help with the tutorial..... thanks for sharing
ReplyDeleteI'm new to blogging and just found your blog this morning and loved your owl so I added you to my blogs I follow. It looks so simple and very cute- could be made into a bag possibly or smaller versions for a purse oooh so many ideas must turn laptop off before I overload lol.
ReplyDeleteMrs T x
I LOVE this little owl!! I am definitely going to give this a go :) Thanks for sharing your design
ReplyDeleteShelly X
I love him! Hello Mr owl and how helpful of you to have a pocket. - annie
ReplyDeleteI just love the way you have made this little owl, it is really lovely
ReplyDeleteArlene
Hi Sarah
ReplyDeleteDenmark calling!
I Love owls so I will surely make one to stand on my desk to admire all time
Thanks for sharing the tute.
Surely I will come back to visit your lovely and inspirational blog
Hugs from Lone
This comment has been removed by the author.
ReplyDeleteI looove this can't wait for tomorrow so I can try. Thank you so much for sharing. Sooooooo cuuuute x
ReplyDeleteI am soooo making this!! LOve the idea and your owl is super cute! Thanks for sharing..
ReplyDeleteEllen
Je me suis permise de mettre un lien vers ce tuto ici sur mon bloc . j'espère que vous ne m'en voudrez pas d'avoir emprunté la photo. sinon, dites le moi, je la retirerai tout de suite; amitiés
ReplyDeleteMerci. Je viens de m'en faire une. Facile et rapide à faire.
ReplyDeleteCatherine
Loved your owl…i've added it to my 'sewing with kids' pinterest board…thanks!
ReplyDeletestuff with rice and nuke in the microwave for winter handwarmers at the bus stop, walking to school, ice skating, football games, etc
ReplyDeleteThis is so cute and simple to do! I love that the instructions are very flexible - just the way I craft. My daughter is making her first quilt and she loves owls. She could not find an owl fabric she liked for the quilt but she can make a pillow, maybe larger than the little one shown, with left over fabric! Love the rice hand-warmer idea, too!!
ReplyDeletewhere can i find the patton
ReplyDeleteHi Elizabeth - It’s just a quick tutorial here on the page. You could try enlarging one of the photos to get the right size for your project, if you like.
DeleteKindest regards,
Sarah